
Running Facebook (Meta) Ads without knowing what happens after someone clicks is like trying to drive blindfolded. That’s where Custom Conversions (in Meta Ads) come in — they help you track specific actions people take on your website so you can see what’s working and spend your money smarter.
Table of Contents
- 💡 What Is a Custom Conversion (in Simple Terms?)
- 📌 When Should You Use Custom Conversions in Meta Ads? (With Beginner-Friendly Examples)
- 🧑💼 1. Service-Based Business
- 🛍️ 2. Ecommerce Store
- 📚 3. Online Coach / Course Creator
- 🏥 4. Clinic or Appointment-Based Business
- 🏢 5. B2B Business
- ✍️ 6. Blog Newsletter or Freebie Download
- 🛠️ How to Set Up a Custom Conversion in Meta Ads (Step-by-Step)
- Before You Begin
- Step 1: Go to Meta Events Manager
- Step 2: Click “Custom Conversions” on the Left Menu
- Step 3: Set Up the Rule
- Step 4: Define the Rule
- 🔍 How to Fix This:
- Step 5: (Optional) Enter a Value
- Step 6: Click Create — Done!
- 🧪 How to Test if It’s Working
- 📊 Using Custom Conversions in Your Meta Ads Campaign
- 🔁 Managing Your Custom Conversions
- ⚠️ Why Is My Custom Conversion Showing Inactive?
- 🚀 Smart Tips for Beginners
- 🎁 Bonus: Visual Flowchart to Troubleshoot Inactive Conversions
- 💬 Final Thoughts
💡 What Is a Custom Conversion (in Simple Terms?)
While Meta has standard events like ‘Purchase’ or ‘Lead’, custom conversions allow you to define more specific versions of these actions based on unique page visits (like a specific thank-you page) or other details. This gives you more control over what success means for your business.
A custom conversion is a way to tell Meta:
“Hey, if someone lands on this page, that means they completed an important action for my business.”
You can use it to track things like:
- Form submissions (e.g., contact form, quote form)
- Product purchases
- Appointment bookings
- Ebook downloads
- Webinar signups
It helps Meta Ads optimize your campaigns to get more people doing that same action.
You can also use custom conversions to filter events using parameters or URLs inside the Meta Events Manager — a powerful way to understand which ads led to valuable website actions.
📌 When Should You Use Custom Conversions in Meta Ads? (With Beginner-Friendly Examples)
Let’s walk through some easy examples so you can understand how different businesses use custom conversions.
🧑💼 1. Service-Based Business
Example: You’re a digital marketer or freelancer and want to track form submissions on your “Get a Quote” page.
- After someone submits the form, they land on:
yourwebsite.com/thank-you - Custom Conversion Rule: URL contains
/thank-you - Category: Lead
✅ Helps track how many leads came from your ad.
🛍️ 2. Ecommerce Store
Example: You sell t-shirts online. After someone buys, they land on: yourstore.com/order-confirmation
- Custom Conversion Rule (in Meta Ads): URL equals
/order-confirmation - Category: Purchase
- Value: ₹799 or the cart value
✅ Helps track your Return on Ad Spend (ROAS).
📚 3. Online Coach / Course Creator
Example: You promote a free webinar. After signup, users go to: yourwebsite.com/webinar-confirmed
- Custom Conversion Rule: URL contains
/webinar-confirmed - Category: Complete Registration
✅ Lets you track how many webinar leads came from your ad.
🏥 4. Clinic or Appointment-Based Business
Example: A dentist tracks appointment bookings.
- After booking, user lands on:
yourclinic.com/appointment-success - Custom Conversion Rule: URL contains
/appointment-success - Category: Lead
✅ Helps optimize ads for patients likely to book.
🏢 5. B2B Business
Example: A software company tracks demo requests.
- After filling out the form, user lands on:
yourdomain.com/thank-you-demo - Custom Conversion Rule: URL equals
/thank-you-demo - Category: Lead
✅ Helps measure serious prospects and optimize ad budget.
✍️ 6. Blog Newsletter or Freebie Download
Example: After someone signs up for your newsletter, they land on /thanks-newsletter
- Custom Conversion Rule: URL contains
/thanks-newsletter - Category: Subscribe or Lead
✅ Perfect for bloggers, content creators, or email marketers.
🛠️ How to Set Up a Custom Conversion in Meta Ads (Step-by-Step)
Before You Begin
- Make sure your Meta Pixel is installed on your website.
- You should already have standard events or custom events (like PageView, Purchase, etc.) firing on your site.
Step 1: Go to Meta Events Manager
Visit: Meta Events Manager
Choose the Pixel you’ve installed on your site.
Step 2: Click “Custom Conversions” on the Left Menu
Then click Create Custom Conversion.
Step 3: Set Up the Rule
- Name: Something clear like “Webinar Signup” or “Appointment Booking”
- Optional: Add a short description
- Data Source: Select your Pixel
- Conversion Event: Choose an existing event (like All URL Traffic, Purchase, Lead, etc.)
- Category: Pick a standard event category that best matches the action (Meta usually suggests one — you can change it)
Step 4: Define the Rule
You can filter the event using:
- URL Rule: e.g., URL contains
/thank-you,/order-confirmation - Event Parameters: Like content_name = “T-shirt”, or content_id = “ABC123”
Parameter rules follow the “OR” condition — great if you’re tracking multiple products with one rule (e.g., Product A OR B OR C)
Multiple rules follow the “AND” condition — if you add separate rules, all must be true to trigger the conversion.
✅ Use the + Add Rule button to include more.
🚫 Important Note: If you see: “No event parameters were detected”, this means your pixel isn’t sending any extra data (parameters) with the event.
🔍 How to Fix This:
- Go to Events Manager > Test Events
- Perform the desired action (e.g., buy a product, submit a form)
- See which parameters (like content_id, value, etc.) are firing
- If nothing shows up, your website or plugin might not be sending those details. You’ll need a developer or plugin like PixelYourSite or GTAG to pass them
📌 Pro Tip: For beginners, using URL-based rules is much easier unless you’ve customized your events setup.
Step 5: (Optional) Enter a Value
If your event doesn’t already have a value, check the box to manually add one (use whole numbers, no ₹ or $ symbols).
Step 6: Click Create — Done!
Your Custom Conversion is now created.
🧪 How to Test if It’s Working
After creating your custom conversion:
- Navigate to the page that should trigger it (e.g., submit your own form)
- Open Events Manager > Test Events
- Enter your website URL and perform the conversion action
- Check if the event appears under “Custom Conversions”
✅ If you see activity, your setup is correct!
📊 Using Custom Conversions in Your Meta Ads Campaign
When creating an ad campaign to use your custom conversion:
- Choose the right campaign objective: Use the Sales or Leads objective. These allow optimization based on custom conversions. If you choose an objective like Awareness or Traffic, Meta won’t let you select custom conversions.
- At the Ad Set level:
- Set Conversion Location to Website.
- In the Conversion Event dropdown, your custom conversion should appear (usually under a “Custom Conversion” label). Select it.
⚠️ If you don’t see your custom conversion here:
- Make sure it has been triggered at least once so its status is “Active” in Events Manager.
- Double-check that the custom conversion is created under the same Pixel connected to the ad account.
- Ensure that your Pixel is firing on the right page. Test this in Events Manager > Test Events.
- Wait a few minutes after creating the custom conversion; sometimes Meta takes time to sync it into Ads Manager.
✅ Once selected, Meta will now optimize your ads to find people most likely to complete that specific action — whether it’s a purchase, form submission, or sign-up.
📌 Note for iOS 14+ Users: If you’re targeting users on iPhones or iPads, remember to configure your custom conversion in Aggregated Event Measurement (AEM) inside Events Manager. This ensures accurate tracking and optimization for privacy-restricted devices.
🔁 Managing Your Custom Conversions
- You can rename or change the value of a custom conversion
- But you cannot edit the URL or parameter rules — create a new one if those need to change
- Delete unused conversions to stay under Meta’s 100-limit per ad account
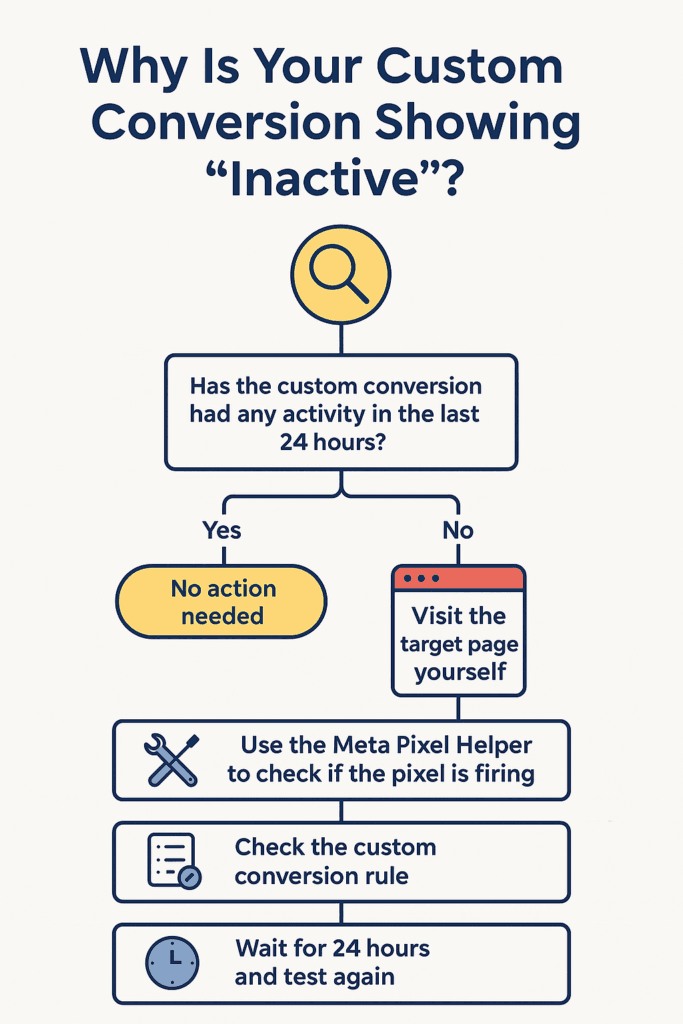
⚠️ Why Is My Custom Conversion Showing Inactive?
If you see Inactive, don’t panic — it means Meta hasn’t detected that event recently.
✅ Try this:
- Visit the target page yourself
- Use the Meta Pixel Helper to confirm your Pixel is firing
- Test in Events Manager to trigger the conversion manually
Once triggered, it will change to Active.
🚀 Smart Tips for Beginners
- Use a consistent naming convention for your custom conversions (e.g., CC – Lead – Quote Form Thank You or CC – Purchase – T-Shirt Confirmation) to easily recognize them later in Ads Manager.
- Always use unique ‘thank you’ or confirmation page URLs for each distinct action you want to track. This is the easiest and most reliable way to set up URL-based custom conversions.
- Use “URL contains” instead of “equals” to avoid errors with dynamic parameters
- Don’t use the homepage URL — it’s too generic
- Prefer URL rules over parameter rules unless you’re sending data through events
🎁 Bonus: Visual Flowchart to Troubleshoot Inactive Conversions
💬 Final Thoughts
Custom Conversions = Clearer Tracking + Smarter Ads + Better Results.
If you want to:
- Optimize for real business actions
- Track lead quality and purchase value
- Spend smarter on Facebook Ads
…then custom conversions are your secret weapon.
Anup Ain
Hey, my name is Anup Ain. I am a blogger and a digital marketing intern. I enjoy sharing my knowledge and experiences with others.